
Thanks for coming :) Today's project is a real oldie. I actually learned how to do this when I was really young. I watched my Mother make one of these out of socks. For some reason or another she needed a heating pad. She just grabbed some of my old dads socks and filled it up with rice, tied a knot on the other end to close it up and stuck it in the microwave. Low and behold she had a heating pad. I thought it was brilliant.
I couldn't really take one of hubbies socks and make one. I was actually making this for one of his co workers. She was having neck issues while in the office and I figured if I made her one of these it would help her. You can also put these in the covers with you during the winter, it will keep you toasty and warm without fire hazard. Just be careful depending on how long you put it in the microwave these can get really hot.

Materials :
Scrap fabric to make it the size that you want with a one inch seam.
Sewing Machine and accessories.
Really cheap rice,not Uncle Bens though.
*Please read all directions before starting project
1. Grab your scrap fabric you intend on using. Let it be a bit stretchy. I used more of that flannel sheet that one of my girls donated to me :)

2. Trim and cut it the shape that you want.

3. Make sure you have an inch seam allowance all the way around.
4. Sew all sides ON THE WRONG SIDE but leave 3 inches open on one of the sides.

5. Turn it inside out and grab a piece of paper and your rice.
6. Roll that piece of paper so it makes a little funnel, put one end in your heating pad and fill it up with rice.

7. Once that is filled fold and tuck that 3 inches in so it matches up with the seam allowance and machine or hand sew.
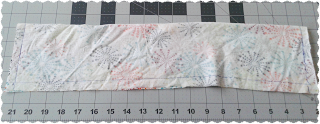
That's it you got yourself a little heating pad that will last as long as the fabric last.

Hope you enjoyed this tutorial as much as I loved making this little heating pad, which by the way only took 20 minutes.
Have fun and thanks for visiting!!

I couldn't really take one of hubbies socks and make one. I was actually making this for one of his co workers. She was having neck issues while in the office and I figured if I made her one of these it would help her. You can also put these in the covers with you during the winter, it will keep you toasty and warm without fire hazard. Just be careful depending on how long you put it in the microwave these can get really hot.

Materials :
Scrap fabric to make it the size that you want with a one inch seam.
Sewing Machine and accessories.
Really cheap rice,not Uncle Bens though.
*Please read all directions before starting project
1. Grab your scrap fabric you intend on using. Let it be a bit stretchy. I used more of that flannel sheet that one of my girls donated to me :)

2. Trim and cut it the shape that you want.

3. Make sure you have an inch seam allowance all the way around.

4. Sew all sides ON THE WRONG SIDE but leave 3 inches open on one of the sides.

5. Turn it inside out and grab a piece of paper and your rice.
6. Roll that piece of paper so it makes a little funnel, put one end in your heating pad and fill it up with rice.

7. Once that is filled fold and tuck that 3 inches in so it matches up with the seam allowance and machine or hand sew.
That's it you got yourself a little heating pad that will last as long as the fabric last.

Hope you enjoyed this tutorial as much as I loved making this little heating pad, which by the way only took 20 minutes.
Have fun and thanks for visiting!!


