Showing posts with label DIY. Show all posts

After months and months of Hubby stepping on pins I finally figured out I needed a pin cushion that some how attaches to me. Yes, I have one but it just never seems to be any where near me when I need it, so I usually just end up putting them on the counter. I also saw something like this on the show Project Runway JR and the fact that I had stepped on two back to back that morning. These are fabulous and adorable, I cant belive I waited this long to make one.


Materials:

1. Scraps of fabric big enough to make 2 circles the size of what you want your cushion to be.
2. Fiberfill
3. Sewing Machine
4. Coordinating fabric
5. fabric Pencil
6. Something to trace your circle ( I used one of my measuring cups)
7. Sewing pins
8. Velcro
9. Fabric Scissors

*Please read all directions before starting tutorial.


1. Grab your scrap fabric and trace two circles of exactly the same size.


2. Cut those out.

3.Measure your wrist and cut out a rectangle piece of fabric as wide as your wrist. Make sure its wide enough so it will fit around your wrist comforably. Eye ball it to give it at least an inch an a half or two just in case.
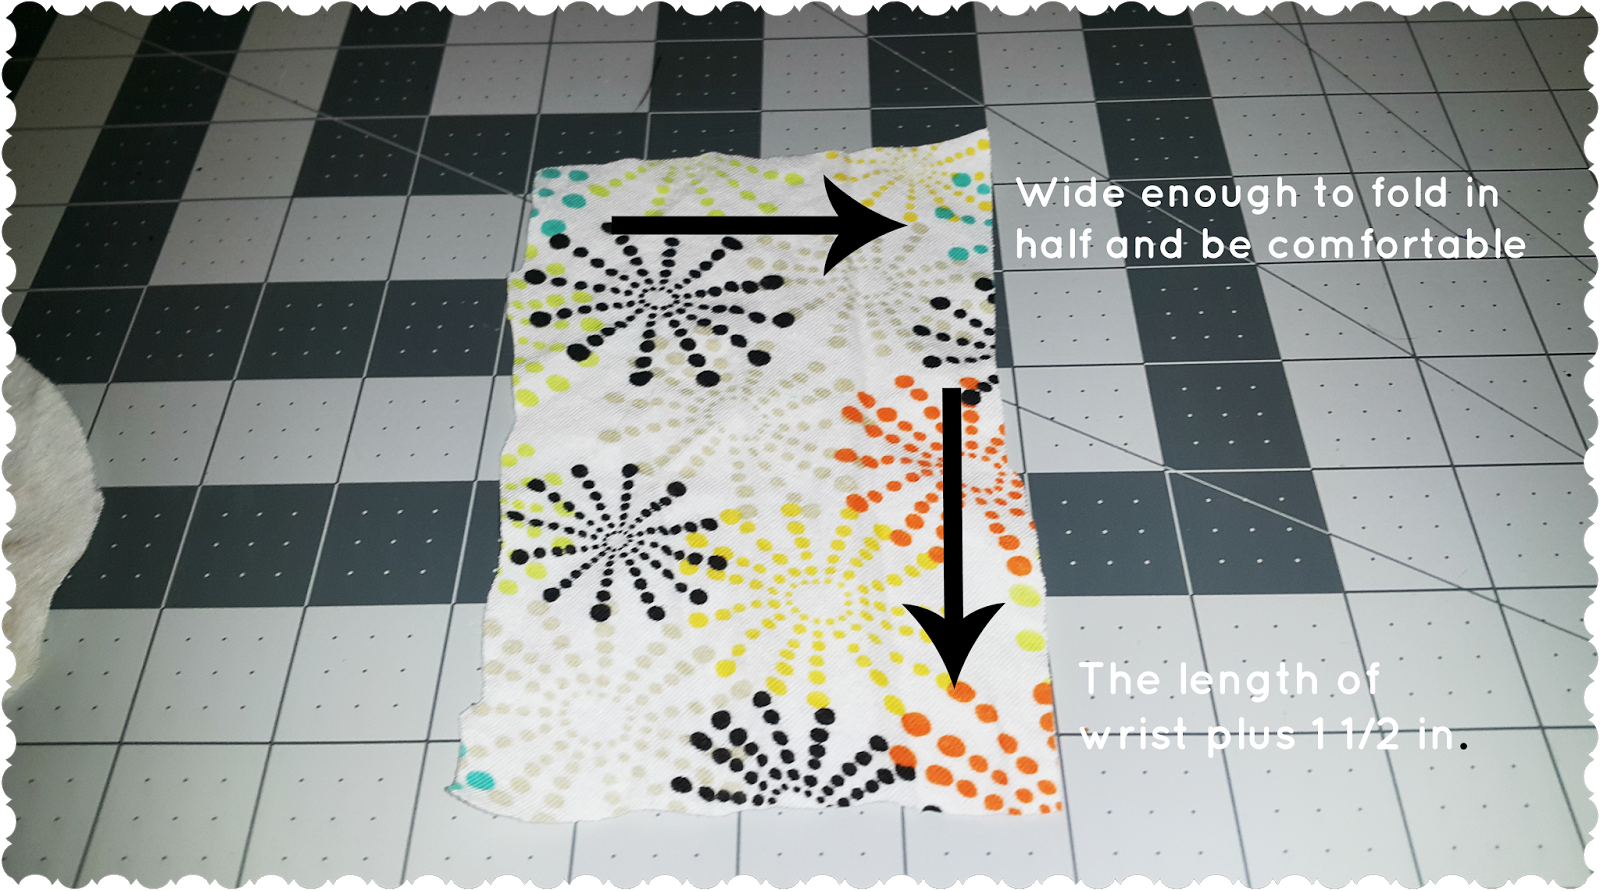
4. Take both circles lay them on top of each other with the prints facing and pin right in the middle. Fold wrist fabric in half length wise and pin.

5. Yey! Finally the fun part! Go to your sewing machine and sew your circle ALMOST all the way around slowly, leave a few inches open so you can put the fiberfill in it. Don't judge the stitches, I did this in quite a hurry. this is the little ones anyways, she insisted I make her one also. Its just for play :)


6. Grab the rectangle fabric that is for your wrist and sew it on the long side. make sure it is wrong side out (print facing in).

7. Sew ONE short side close.

8. Turn both fabrics right side out using the spaces you left unsewn.

9. Fill your ball up with fiberfill.

10. Hand sew your the rest of your ball up.

11. When that is done, push your needle though the top middle of your ball.

12.Go back to the top middle and push it though again. Arrange your thread so that it is spread out throughout the ball so it looks like your typical pin cushion.


13. Take your Velcro and cut 2 out two pieces that fit on your wrist strap. Place Velcro on wrist wrap so it fits your wrist.

14 Sew the Velcro to wrist wrap on OPPOSITE sides.

15. Take your pin cushion and hand sew it on the strap. I did one with it on the side and one with it on the middle of the wrist wrap.

16. There you go, now you have a must have sewing accessorize that cost a bit over $5 or more at a craft store, but this is personalized by you and hand made by you.

The little one loves hers, she's been wearing it for days like a bracelet..lol


We have a real issue in this house with stuffed animals, I'm sure anyone with kids can relate. They are seriously everywhere! I've been thinking for a long time in what to make so I can keep these little monsters somehow contained. I looked at the DIY cages, those bags that hold them that look like bean bags. I had an issue with all of them.

One I don't want to spend the money buying anything. I mean I figured I could somehow make something out of an item that I am no longer using.

Two. I am a beginner when it comes to sewing and my machine is also for beginners. I did not want to try to attempt that 5 pannel bean bag. It was exhausting just reading the directions.

It was sometime last week that I was cleaning. I looked in the Lil One's closet and wanted to scream. There were stuffed animals all over the floor, toys all over the floor and clothes I swear I just folded the day before.
Yeah, she's a messy girl. Considering she use to have a playroom and since we've moved, her toys now have to share a walk in closet with her clothes. She has no room for anything. Now this is after we donated more than half her big toys that she's grown out of.

Anyways back to the point. I decided I needed to make something right then to fix the problem. I looked in my fabric stash ( all donated by friends or old clothes/curtains/sheets/blankets that we no longer use) and found a strip of fleece that one of my girls donated to me ( thanks woman!). Yeah it looks like its for a boy, but seriously who cares. The Lil one did but I explained to her that it was a quick solution and I would replace it with "prettier" fabric when I found the right one.

Materials
1. Any fabric. Handles(6 of these) Body measures 46x32
2. Coordinating thread
3. Sewing machine
4. Fabric scissors

*Please read all directions before starting project.

1.Laid my fabric out, It came from a friend like this so I just eye balled it and measured it after I cut out the part that I wanted for the straps. Decide how big of a bag you want. Mine measured 46x32.

2. Take the smaller part or the fabric that you cut off and cut it into 3 long straps then cut those in half. Turn those wrong side out and Pin. Do this to all 6 of them.

3. Sew along the long part of the fabric. Make sure that the front of your fabric is on the inside. Then sew ONE end close.

4.Turn them right side out and they should look like so.


5. Take the "bag" part and turn it inside out, then sew the sides.

6. Take the top of your bag and pin it to an inch seam allowance, decide where you need the straps, pin all 6 straps to both sides of the bag, 3 on each side. Then sew the top of the bag all the way down.


7. When that is done go back to your straps and sew the top parts of it to the straps to the bag. Do this with each strap it will reinforce it.


8. Turn it inside out and tie it to wherever you need it, tie straps in a bow then your done!. Simple quick storage solution.


*This pic will show you exactly how big the bag is and how may stuffed animals it should fit, yes it's almost as big as she is.


These are so easy to make and they are a great handmade gift. The Lil one and I made this for hubby and he loved it.

Materials:
1. Any fabric that you can truly see the needle work against. I used left over woven interface, not only was it available it reminded me of canvas.
2. What ever thread you want to use for it but I recommend needlework thread. Since my background was white, I used black thread.
3. Needle
4. Cross stitch hoop
5. A nice frame to put it in.
6. Fabric pencil or pen

* Please read all directions before starting project.

1. Take your fabric and cut it to the specifications of the frame that you intend on using.

2. Take your hand and trace the Vulcan Salute on it, and add " Live long and Prosper" with your writhing wherever you want it. I traced our little ones hand and had her write it since it was her gift to her dad.

3. Backstich over hand and motto. If you dont know how to backstitch watch this video. Its very simple.

4. Put it in the frame and give it as a gift or add it to your collection like hubby did his. Enjoy :)
Ok so not last tutorial, but the tutorial before that I showed you how to print on fabric using your printer (this one).Today I'm going to show you how to apply that fabric to a burlap pillow, hell any pillow for that matter. And also of course to make a couch pillow.

Just so Ya'll know, now that I am writhing this at least a week after using my printer to print on burlap... Well never print on burlap. My printer was perfectly fine printing on fabric until it met burlap that day. Yeah... parts of burlap stayed in the printer and when I tried to use the printer again, it kept on getting a paper jam because the strings of burlap were jamming it up. Anyways to make a very long story short. It took me at least an 30 minutes to clean out my printer and another 30 for it to clean itself til it can actually print normal again. Do not use burlap on your printer. Normal fabric is fine, but do not use burlap ever.


Materials:
1. Graphic on fabric ( Ignore this if you just want to simply make a pillow)
2. Two pieces of fabric. One for the lining of the pillow, one for the pillow itself.
3. Fiberfill
4. Coordinating thread
5. Sewing machine
6. Sewing pins
7.Rotary cutter/ fabric scissors with mat
8. Acrylic ruler

*Please read whole tutorial before starting project.

1. Cut lining and main fabric how ever you big you want the pillow to be. Give it at least half and inch seam allowance. I simply used 15X15 for mine. * If you are working with burlap, don't use your fabric scissors to cut it, seriously unless you intend on buying new ones.


Now you should have 2 pieces for the lining and 2 pieces for the outside part of your pillow.

2. Take one piece of lining and put it on top of main fabric, line it up and pin it. This will be one side your pillow, Do the same with the other 2 pieces.

3. Take your piece of fabric that has the graphic on it, you know the one that almost broke my printer. Decide where you want it on your pillow and pin it.

4. Take all 3 pieces ( graphic, lining and top part of the pillow ) to your sewing machine and sew on the piece of fabric that has the graphic. You should be sewing it on to the main fabric and the lining, the outside part.

5.Once that's done Take all 4 pieces ( both sets of main fabric and lining) put them wrong side out ( the graphic should be on the inside) line them up together and use pins to pin them together.

6. Take it to your sewing machine and use your half and inch seam allowance and sew the edges but leave at least 5 inches open.

7. Take the 5 inch opening you left and turn pillow to the right side so that the graphic is on the outside part.

8. Take your fiberfill and fill in your pillow. Once that is done take the 5 inches fold in the seam allowence and press. Use a ladder stich to close it up. If you dont know how to do a ladder stich just go here at How to sew for the super simple tutorial.

There you go, not only do you know how to make a simple pillow, but you also know how to personalize it. Remember, do not use burlap on your printer.


Today I want to show you how to make an awesome paper mache sculpture out of the star trek insignia, especially since Star wars came just came and I like Star wars just fine, but I love me some Star Trek so I had to show some Trekkie love.


Materials:
1. Cardboard saved from cereal boxes or whatever
2. Tape
3. Paper mache Glue. If you don't have the recipe you can it at the bottom of this tutorial.
4. Silver spray Paint
5. Gold Spray Paint
6. Scissors
7. Toilet paper roll
8. Glue
9. Strips of newspapers.

*Please read tutorial before starting project


1. Get on google and search for "Star Trek Delta Shield". Look at an example of one of the images.


2. Take two of your card board boxes and draw free hand the shield itself for how ever big you want it. One for the each part of the Delta shield . Take your scissors and cut them out.

3. Take your cardboard cutouts and trace them on two other pieces of cardboard and cut it out so you have two copies of each piece of the Delta Shield for your top part and bottom part.

4. Take your toilet paper roll and cut it in 4 pieces keeping in mind that they each pair has to be exactly the same height.

5. Take pieces of your toilet paper roll the same size and glue it on top of one piece of the Delta Shield, glue other piece on top of the small pieces of toilet paper roll. Let it dry.

6. Once that dries, take your take tape and use it to ill in the gaps on the sides.


7. With your ready paper mache glue, grab your newspapers dip it in your glue and go to town :) Once its all covered let it dry for 24 to 48 hours and add another layer of glue and newspaper. The more layers you put on it the harder the Shield will get. I only put 2 layers on mine.


8. Once you are satisfied with your shield and its completely dry, spray paint the Star Fleet arrow-head silver and the shield itself gold. When you spray paint keep spray paint nozzle at least 6 inches away from object or you will get too much paint on it and the paint will run. Put on as many layers as you want. let that dry and your done. :)
