
Yes, I know I said I would post this Sunday and I dint. What can I say, I have a life :) plus I just finished my wreath tonight. Those dam flowers took forever to make. I seriously hate making those flowers.
You have no idea what I'm talking about do you? Well you will find out once you start making them for this Wreath.
Well lets get to it then...

Materials:
Coffee filters ( I used about 300 on this wreath)
Food coloring
Tape
stapler
Scissors (Not your fabric scissors!)
Card Board boxes ( I used 4 12 pack beer/soda boxes)
Glue gun with glue
*Please read all directions before starting project.
1. Grab a huge bowl put 2 cups of water in it, add your food coloring until you get the desired color.
2. Separate coffee filters ( I did 10 at a time) and submerge them in the bowl. Gently wring them out and pile them in a Tupperware till you do about 100 of them.
3. Once that is done, stick them in your dyer on low. You can let them air dry but that will take at least a day to do and no one has time for that. keep an eye on them. I only put mine in for 10 minutes. Do not walk to far away from your dyer, you don't want to start a fire so watch them carefully.
4.once they are dry, they are going to be so wrinkly. You can Iron them if you want but I did not iron mine. Unfold them and stack them by 6.

5.Fold them in half and cut the edge so that it has that scalloped effect.

6.Keep them stacked, put your hand under the pile and pinch them from the bottom.

7. Pinch the bottom all together.

8.And staple the bottom.

9.lay it out flat once again and spread the petals.

10. Take your first layer ( you should have 6) and pinch it together so that it forms the petals.

11. Keep doing so till you get to the last layer.

12.Once you get to the last layer turn it around and pinch the bottom like this.

13. Tape around that bottom, turn it around and "fluff" the flower. There you go, now you just have to make more to fill your wreath which I will show you how to make.

14. Grab your cardboard box, break it down flat. Grab something that you can use to make a big circle. A bowl, a pan, anything as long as its as big as you want your wreath to be. Trace your circle on all 4 boxes. I can only trace half a circle on each cardboard box. I used 4 to layer it. I dint want it flimsy.

15. Cut those out.

16. I measured 3 inches into each circle and cut out the middle. I got way to involved in this step and I forgot to take pictures. The point is to make a big ring with the cardboard boxes.
17. Once you have your ring, staple it together so you have a solid ring, it should not be to flimsy.
18. Once that is done, all you have left is use your glue gun and arrange and glue your flowers to your ring. Repeat steps 1-13 if you need more flowers. Good luck, and don't do this on the floor like I did or your going to have a very sore back by the time your done.


* The heart pillows were a last minute add in to break up the monotony of the pink. To make a pillow see my tutorial. Don't add a lining though. The Doctor Who/minecraft/startrek symbols were added with Iron on transfers. It took me half an hour to do all 3 pillows.

You have no idea what I'm talking about do you? Well you will find out once you start making them for this Wreath.
Well lets get to it then...
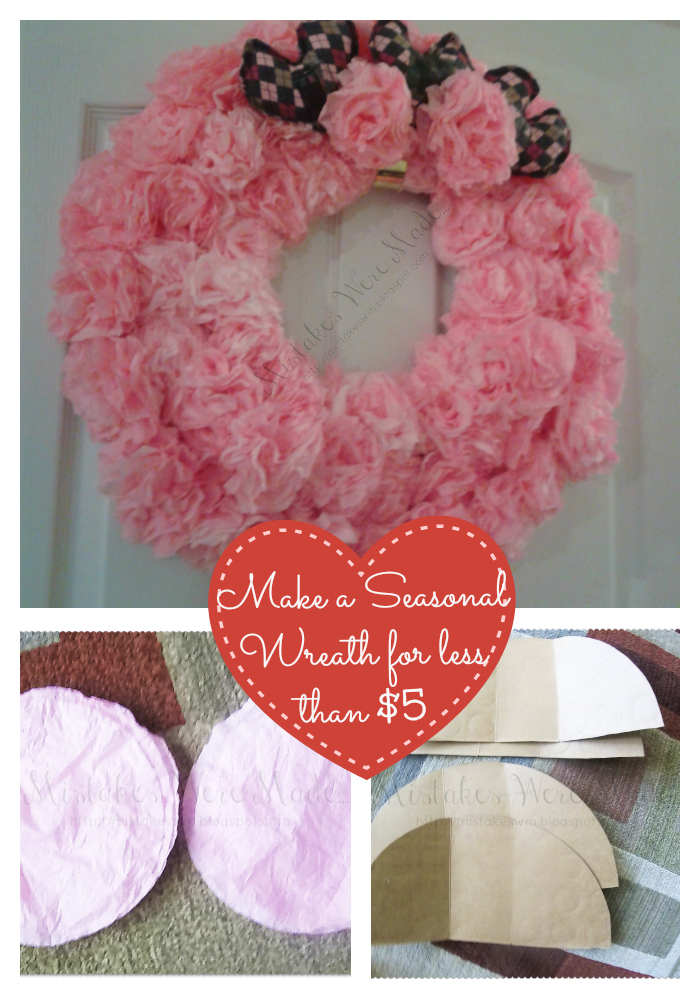
Materials:
Coffee filters ( I used about 300 on this wreath)
Food coloring
Tape
stapler
Scissors (Not your fabric scissors!)
Card Board boxes ( I used 4 12 pack beer/soda boxes)
Glue gun with glue
*Please read all directions before starting project.
1. Grab a huge bowl put 2 cups of water in it, add your food coloring until you get the desired color.
2. Separate coffee filters ( I did 10 at a time) and submerge them in the bowl. Gently wring them out and pile them in a Tupperware till you do about 100 of them.
3. Once that is done, stick them in your dyer on low. You can let them air dry but that will take at least a day to do and no one has time for that. keep an eye on them. I only put mine in for 10 minutes. Do not walk to far away from your dyer, you don't want to start a fire so watch them carefully.
4.once they are dry, they are going to be so wrinkly. You can Iron them if you want but I did not iron mine. Unfold them and stack them by 6.

5.Fold them in half and cut the edge so that it has that scalloped effect.

6.Keep them stacked, put your hand under the pile and pinch them from the bottom.

7. Pinch the bottom all together.

8.And staple the bottom.

9.lay it out flat once again and spread the petals.

10. Take your first layer ( you should have 6) and pinch it together so that it forms the petals.

11. Keep doing so till you get to the last layer.

12.Once you get to the last layer turn it around and pinch the bottom like this.

13. Tape around that bottom, turn it around and "fluff" the flower. There you go, now you just have to make more to fill your wreath which I will show you how to make.

14. Grab your cardboard box, break it down flat. Grab something that you can use to make a big circle. A bowl, a pan, anything as long as its as big as you want your wreath to be. Trace your circle on all 4 boxes. I can only trace half a circle on each cardboard box. I used 4 to layer it. I dint want it flimsy.

15. Cut those out.

16. I measured 3 inches into each circle and cut out the middle. I got way to involved in this step and I forgot to take pictures. The point is to make a big ring with the cardboard boxes.
17. Once you have your ring, staple it together so you have a solid ring, it should not be to flimsy.
18. Once that is done, all you have left is use your glue gun and arrange and glue your flowers to your ring. Repeat steps 1-13 if you need more flowers. Good luck, and don't do this on the floor like I did or your going to have a very sore back by the time your done.


* The heart pillows were a last minute add in to break up the monotony of the pink. To make a pillow see my tutorial. Don't add a lining though. The Doctor Who/minecraft/startrek symbols were added with Iron on transfers. It took me half an hour to do all 3 pillows.




 Posts
Posts


