Showing posts with label sewing. Show all posts
 A few days ago, hubby received some swag from work, well it was a large X box T shirt. He dint want it, but he took it home cause he knew I would want the shirt or use the fabric for whatever. Anyways I loved the shirt, but it was gigantic on me so I decided to do a few things to it so I can actually wear it, well besides to bed that is.

So today I'm going to show ya'll how I did it. Its adorable, I just finished it tonight (sat) and I intend on wearing while we are out tomorrow. Hey it beats my normal T shirt and Jeans that I love wearing.


 Materials:

1. Elastic ( Long enough to fit around your shoulder. Mine is re purposed from a fitted sheet)

2. Large T shirt

3. You sewing machine and tools that come with it.


* Please read all directions before starting project


1. Grab your large t shirt, don't go out and buy one. I'm sure you have one laying around that you no longer wear. The pics are a bit off, I dint have enough patience to grab and set up the Go Pro.


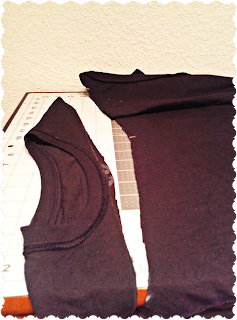


2. Turn it inside out and lay it out,mark the middle of the collar. From the seam of one sleeve measure one inch in and mark. Do the same with the other sleeve. Connect marks just like this.


3. Grab your fabric scissors and carefully cut the shirt following this line.


4.  Make a 1 inch seam on the top part of the shirt where you just cut, all the way around. This is where your elastic is going to go.


5. Once that is done, sew all the way around BUT leave a about a half an inch un-sewn so you can put your elastic though here. Grab your elastic and work it though the tube.  Once the elastic is though, put shirt on and measure how much elastic you need to cut off. make sure its comfortable on you, not to loose or not to tight. While you still have the shirt on, cut the elastic to take off excess and tie each side together to complete the shoulder. Take the un-sewn part back to your sewing machine and sew. It should look like this.


6. Lay out you shirt so that the sleeves are flat, from the armpit make an angled line to trim the sleeves like this. Do the same thing about an 2 inches away from the elastic on the shoulder. Don't touch the other sleeve just yet.


7.  Cut sleeve using your line and pin. Take the little pieces that you just cut out put it on top of the other sleeve and use them like patterns so the two sleeves are exactly the same size and cut. You cant tell here, but I pinned the little pieces on top of the other sleeve before I cut it. I recommend you doing the same. After you cut to match the other sleeve pin it as you did the other.


8. Lay the bottom of your shirt out ( make sure your shirt is still inside out and your working on the front of the shirt).  Measure 3 inches from the bottom and 3 inches from the side on each side and mark it. 
I did mine 5 inches from the bottom since I am so short, its really up to you how short you want the shirt.


9.  Using you marks bunch and pin. bunched about an inch and pinned it and I did this 3 times. So I started 3 inches from the side, grabbed the bottom bunched and pin til I got to my 3 inch ( or 5 in my case) mark. Do this on both sides of your shirt and only to the front.


10. Grab a ruler and take the bottom of ruler and sit it flat right on top of the last bunch you just pinned, align the ruler so it meets the side seam and mark a line, do this on both side and it should look like this. (without the wrinkles in the middle)


11. Go back to your sleeves and sew right on the edges of the cuts so that they are complete sleeves, then starting at the bottom of your shirt, using your marked line sew over the bunches and follow the line all the way to the edge of the shirt. Do this on both sides and that's it! You got yourself a cute little off the shoulder shirt. Just add a cute necklace and a skirt or jeans, your set.


Have fun adding this to wardrobe this summer :)


Hello :), I know its been a minute... what can I say I guess I proved to myself I am more Gamer than I am a crafter :P.
Anyways today I am going to show you how to re-purpose your old towels into hanging dish towels. Way better than spending your money on a few that will probably just get stained and eww anyways. You might as well recycle as you do so.


Materials:

Old Towel
Any scrap Fabric/ fabric
Velcro Strip ( You can get a strip at almost any store for $2, or find something you don't need that has Velcro.)
Sewing Machine and your typical tools that go with it.
Printer Paper
Printer


**Please read all directions before starting project**

1.Grab your scrap fabric, this is leftover sheet material from the Fabric Shower Curtain Tutorial. Cut it in 12x4 inch strips. This will make the border of your Dishtowel. You need 3 for each dish towel you intend to make.


2. Fold them in half the wrong way of the fabric and sew them into bindings, and turn right side out so that the part you sewed is on the inside.


3. Go to kleiosbelly which is the blog that inspired me to make these, but hers is made a bit different than mine. Grab her pattern or you can free hand your own, its much easier to borrow hers, seriously I tried to free hand mine and it turned out all wonky. Anyways print out her pattern, cut it out and place it on more scrap fabric you intend on using. Pin and cut out. You need 2 of each pattern (front and back) for one dish towel.


4. Take the top part and bottom of the pattern line it up so the right sides are facing each other and sew.


5. Do this to all 4 and this is how it should look.


6. Grab your Velcro and cut out a square piece of each side about this big.


7. Grab one of your completed pattern and decide where you want the Velcro. Remember the Velcro is what is going to secure the dish towel on what ever you intend on fastening it on. Make sure they are lined up correctly and you have enough room once they are fastened together for the handle of the oven or the drawer or whatever you want to put it on. Pin it and sew around the edges of the Velcro.


8. Grab your old towel and cut it 12x10. 12 inch across and 10 inch down.


9. Take the bindings that you made, line it up to the edge of your towel, fold it around the edge so that it is even on each side of the 10 inch sides, pin and sew. Do this for each side EXCEPT of the top part of the towel. Make sure to overlap the bindings on the corners so you it looks finished. Cut of whatever is left over.


10. Grab the 2 patterns that is going to be the top part of the dishtowel. Face them right side together. The velco should be on the inside, pin and sew around the edge except for the bottom part which is the widest part.


11. Turn in right side in and this is what it should look like.


12. With the velcro facing down, take the pattern back to your sewing machine and do a top stitch to finish it off. This is how it should look once you are done.


13. Set that aside and grab you towel and fold it as you would a paper fan on top. For each fold pin it. It should now measure 6 inches across.


14. Sew it all the way across. Keep the folded parts folded as you sew.


15. Take the top part of your dish towel and tuck the towel in it about an inch. Use your thumbs and fold the fabric about a quarter of an inch to make a seam and pin it once its straight.


16. Sew right on the edge with a decorative stitch, I used the zigzag stitch.And that's it! You can make 6 dishtowels with one old bath towel. Now you never have to buy dish towels ever again :)


Thanks for coming :) Today's project is a real oldie. I actually learned how to do this when I was really young. I watched my Mother make one of these out of socks. For some reason or another she needed a heating pad. She just grabbed some of my old dads socks and filled it up with rice, tied a knot on the other end to close it up and stuck it in the microwave. Low and behold she had a heating pad. I thought it was brilliant.
I couldn't really take one of hubbies socks and make one. I was actually making this for one of his co workers. She was having neck issues while in the office and I figured if I made her one of these it would help her. You can also put these in the covers with you during the winter, it will keep you toasty and warm without fire hazard. Just be careful depending on how long you put it in the microwave these can get really hot.


Materials :

Scrap fabric to make it the size that you want with a one inch seam.

Sewing Machine and accessories.

Really cheap rice,not Uncle Bens though.

*Please read all directions before starting project


1. Grab your scrap fabric you intend on using. Let it be a bit stretchy. I used more of that flannel sheet that one of my girls donated to me :)


2. Trim and cut it the shape that you want.


3. Make sure you have an inch seam allowance all the way around.


4. Sew all sides ON THE WRONG SIDE but leave 3 inches open on one of the sides.


5. Turn it inside out and grab a piece of paper and your rice.

6. Roll that piece of paper so it makes a little funnel, put one end in your heating pad and fill it up with rice.


7. Once that is filled fold and tuck that 3 inches in so it matches up with the seam allowance and machine or hand sew.


That's it you got yourself a little heating pad that will last as long as the fabric last.


Hope you enjoyed this tutorial as much as I loved making this little heating pad, which by the way only took 20 minutes.
Have fun and thanks for visiting!!

I love sheets! Especially ones that I no longer need. So much fabric for the taking!!!


Materials:

1. Old Sheet

2. Sewing Machine and accessories

3. Shower curtain or shower linear so you can copy where the rings should go


1. Take your shower curtain liner down, or an old shower curtain. Grab the sheet you intend on using and lay it out so that the liner is on top of the sheet.


2. Measure and mark 1 inch seam on the side of the linear, 2 inch seam on where your top is going to be and 3 inch seam on the bottom of where the bottom will be then cut.


3. Lay them both back out again with the liner on top.


4. Grab your chalk or fabric pencil and mark where the shower rings should go, make sure its under the 2 inch seam. Line it up so its straight and pleasing to the eye before you start marking.


5. Pin all your seams and sew.


6. Take your chalk marks and put a pin in each one, you will be using your sewing machine to sew a circle or square design around each pin, use a zig zag or decorative stich for this. You are better off with the pins without the little balls on them, but if that is all you have please be careful or you may break your sewing machine.


7. It should be similar to this once you are done with one.


8. Once you are done with that, you can simply cut a slit where each shower ring should be or you can cut out what is inside the design.


* The hello kitty shower curtain was embellished with bows, you can find the tutorial here. I simply just hand sewed the bows right under where the rings should be.
The brown shower curtain was simply made out of 2 fabrics. I used a woven fabric for the top and simply sewed the sheet and the other fabric together, which I purchased as a drape from the GoodWill for $1.99. Ahh the fabulous cheap fabrics you can find in there is simply amazing :)


Thanks for visiting Dahlings!!
