Showing posts with label Fan girl diy. Show all posts
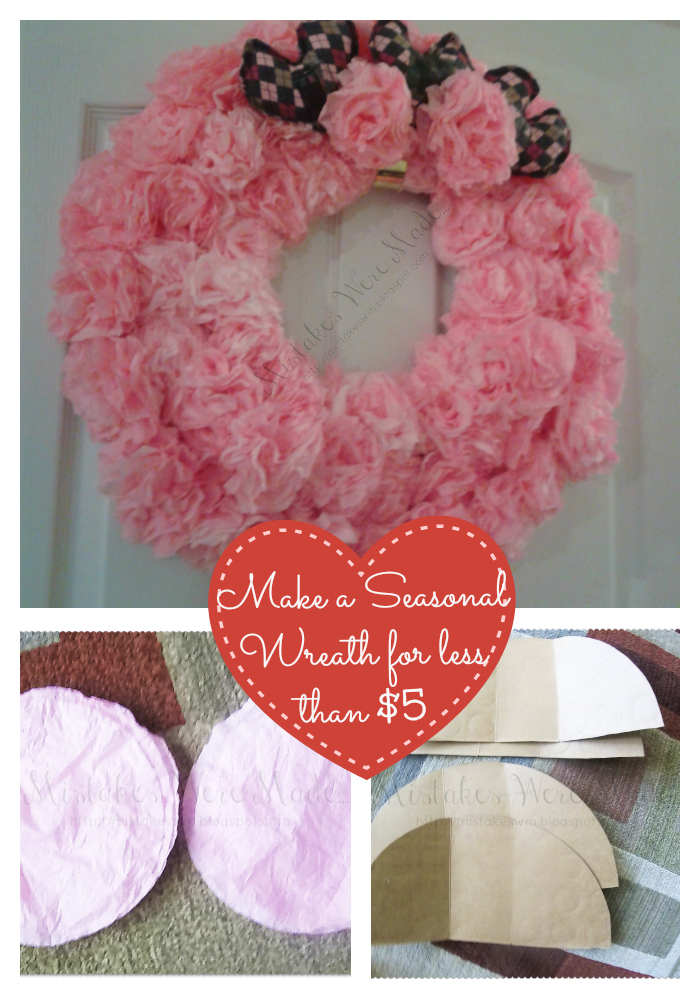
Yes, I know I said I would post this Sunday and I dint. What can I say, I have a life :) plus I just finished my wreath tonight. Those dam flowers took forever to make. I seriously hate making those flowers.
You have no idea what I'm talking about do you? Well you will find out once you start making them for this Wreath.
Well lets get to it then...


Materials:

Coffee filters ( I used about 300 on this wreath)
Food coloring
Tape
stapler
Scissors (Not your fabric scissors!)
Card Board boxes ( I used 4 12 pack beer/soda boxes)
Glue gun with glue

*Please read all directions before starting project.


1. Grab a huge bowl put 2 cups of water in it, add your food coloring until you get the desired color.

2. Separate coffee filters ( I did 10 at a time) and submerge them in the bowl. Gently wring them out and pile them in a Tupperware till you do about 100 of them.

3. Once that is done, stick them in your dyer on low. You can let them air dry but that will take at least a day to do and no one has time for that. keep an eye on them. I only put mine in for 10 minutes. Do not walk to far away from your dyer, you don't want to start a fire so watch them carefully.

4.once they are dry, they are going to be so wrinkly. You can Iron them if you want but I did not iron mine. Unfold them and stack them by 6.


5.Fold them in half and cut the edge so that it has that scalloped effect.


6.Keep them stacked, put your hand under the pile and pinch them from the bottom.


7. Pinch the bottom all together.


8.And staple the bottom.


9.lay it out flat once again and spread the petals.


10. Take your first layer ( you should have 6) and pinch it together so that it forms the petals.


11. Keep doing so till you get to the last layer.


12.Once you get to the last layer turn it around and pinch the bottom like this.


13. Tape around that bottom, turn it around and "fluff" the flower. There you go, now you just have to make more to fill your wreath which I will show you how to make.


14. Grab your cardboard box, break it down flat. Grab something that you can use to make a big circle. A bowl, a pan, anything as long as its as big as you want your wreath to be. Trace your circle on all 4 boxes. I can only trace half a circle on each cardboard box. I used 4 to layer it. I dint want it flimsy.


15. Cut those out.


16. I measured 3 inches into each circle and cut out the middle. I got way to involved in this step and I forgot to take pictures. The point is to make a big ring with the cardboard boxes.

17. Once you have your ring, staple it together so you have a solid ring, it should not be to flimsy.

18. Once that is done, all you have left is use your glue gun and arrange and glue your flowers to your ring. Repeat steps 1-13 if you need more flowers. Good luck, and don't do this on the floor like I did or your going to have a very sore back by the time your done.


* The heart pillows were a last minute add in to break up the monotony of the pink. To make a pillow see my tutorial. Don't add a lining though. The Doctor Who/minecraft/startrek symbols were added with Iron on transfers. It took me half an hour to do all 3 pillows.


These are so easy to make and they are a great handmade gift. The Lil one and I made this for hubby and he loved it.

Materials:
1. Any fabric that you can truly see the needle work against. I used left over woven interface, not only was it available it reminded me of canvas.
2. What ever thread you want to use for it but I recommend needlework thread. Since my background was white, I used black thread.
3. Needle
4. Cross stitch hoop
5. A nice frame to put it in.
6. Fabric pencil or pen

* Please read all directions before starting project.

1. Take your fabric and cut it to the specifications of the frame that you intend on using.

2. Take your hand and trace the Vulcan Salute on it, and add " Live long and Prosper" with your writhing wherever you want it. I traced our little ones hand and had her write it since it was her gift to her dad.

3. Backstich over hand and motto. If you dont know how to backstitch watch this video. Its very simple.

4. Put it in the frame and give it as a gift or add it to your collection like hubby did his. Enjoy :)
Ok so not last tutorial, but the tutorial before that I showed you how to print on fabric using your printer (this one).Today I'm going to show you how to apply that fabric to a burlap pillow, hell any pillow for that matter. And also of course to make a couch pillow.

Just so Ya'll know, now that I am writhing this at least a week after using my printer to print on burlap... Well never print on burlap. My printer was perfectly fine printing on fabric until it met burlap that day. Yeah... parts of burlap stayed in the printer and when I tried to use the printer again, it kept on getting a paper jam because the strings of burlap were jamming it up. Anyways to make a very long story short. It took me at least an 30 minutes to clean out my printer and another 30 for it to clean itself til it can actually print normal again. Do not use burlap on your printer. Normal fabric is fine, but do not use burlap ever.


Materials:
1. Graphic on fabric ( Ignore this if you just want to simply make a pillow)
2. Two pieces of fabric. One for the lining of the pillow, one for the pillow itself.
3. Fiberfill
4. Coordinating thread
5. Sewing machine
6. Sewing pins
7.Rotary cutter/ fabric scissors with mat
8. Acrylic ruler

*Please read whole tutorial before starting project.

1. Cut lining and main fabric how ever you big you want the pillow to be. Give it at least half and inch seam allowance. I simply used 15X15 for mine. * If you are working with burlap, don't use your fabric scissors to cut it, seriously unless you intend on buying new ones.


Now you should have 2 pieces for the lining and 2 pieces for the outside part of your pillow.

2. Take one piece of lining and put it on top of main fabric, line it up and pin it. This will be one side your pillow, Do the same with the other 2 pieces.

3. Take your piece of fabric that has the graphic on it, you know the one that almost broke my printer. Decide where you want it on your pillow and pin it.

4. Take all 3 pieces ( graphic, lining and top part of the pillow ) to your sewing machine and sew on the piece of fabric that has the graphic. You should be sewing it on to the main fabric and the lining, the outside part.

5.Once that's done Take all 4 pieces ( both sets of main fabric and lining) put them wrong side out ( the graphic should be on the inside) line them up together and use pins to pin them together.

6. Take it to your sewing machine and use your half and inch seam allowance and sew the edges but leave at least 5 inches open.

7. Take the 5 inch opening you left and turn pillow to the right side so that the graphic is on the outside part.

8. Take your fiberfill and fill in your pillow. Once that is done take the 5 inches fold in the seam allowence and press. Use a ladder stich to close it up. If you dont know how to do a ladder stich just go here at How to sew for the super simple tutorial.

There you go, not only do you know how to make a simple pillow, but you also know how to personalize it. Remember, do not use burlap on your printer.


Today I want to show you how to make an awesome paper mache sculpture out of the star trek insignia, especially since Star wars came just came and I like Star wars just fine, but I love me some Star Trek so I had to show some Trekkie love.


Materials:
1. Cardboard saved from cereal boxes or whatever
2. Tape
3. Paper mache Glue. If you don't have the recipe you can it at the bottom of this tutorial.
4. Silver spray Paint
5. Gold Spray Paint
6. Scissors
7. Toilet paper roll
8. Glue
9. Strips of newspapers.

*Please read tutorial before starting project


1. Get on google and search for "Star Trek Delta Shield". Look at an example of one of the images.


2. Take two of your card board boxes and draw free hand the shield itself for how ever big you want it. One for the each part of the Delta shield . Take your scissors and cut them out.

3. Take your cardboard cutouts and trace them on two other pieces of cardboard and cut it out so you have two copies of each piece of the Delta Shield for your top part and bottom part.

4. Take your toilet paper roll and cut it in 4 pieces keeping in mind that they each pair has to be exactly the same height.

5. Take pieces of your toilet paper roll the same size and glue it on top of one piece of the Delta Shield, glue other piece on top of the small pieces of toilet paper roll. Let it dry.

6. Once that dries, take your take tape and use it to ill in the gaps on the sides.


7. With your ready paper mache glue, grab your newspapers dip it in your glue and go to town :) Once its all covered let it dry for 24 to 48 hours and add another layer of glue and newspaper. The more layers you put on it the harder the Shield will get. I only put 2 layers on mine.


8. Once you are satisfied with your shield and its completely dry, spray paint the Star Fleet arrow-head silver and the shield itself gold. When you spray paint keep spray paint nozzle at least 6 inches away from object or you will get too much paint on it and the paint will run. Put on as many layers as you want. let that dry and your done. :)


Materials:

Tardis blue fabric enough to make as big of a pillow as you want

Black Fabric for the middle of the bow tie

White Fabric to make your Tardis windows

Black Thread

Acrylic ruler

Rotary cutter or scissors

Fabric Pen

Pillow filler

Sewing Machine

* I used an old shirt of mine and an old shirt of our little ones and one black leg of some old yoga pants. There is no point in buying the fabric if you already have it. And I used an old pillow for the stuffing that none of us wanted to have anything to do with cause it was so lumpy and weird.


1. First I cut my blue shirt to make a square. I cut it from the bottom part o the arm pit to the other. If your just using normal fabric measure it to the square size that you want the pillow to be. Leave at least half an inch seam allowance.

*Since I used a shirt, both long sides were already sewn. I used my seam ripper and un-seemed one long side.


2. Cut 4 rectangles out of your white fabric.


3. Turn your 4 rectangles to the wrong side and use your fabric pen to draw your window panes for the Tardis.


4. Take one of your squares for your pillow (blue fabric), pin the windows where you want them. And do the same to the other square.


5. Sew your windows to your blue fabrics, sew over the lines of the window panes that you drew, so that the lines of the windows are prominent.

6. Take both squares, face windows together and pin, sew all sides ( with your seam allowance) together BUT leave at least 5 inches open so you can put the pillow stuffing in.

7. Stuff your pillow, not to full. You want to be able to put the band around it so it looks like a bow. Just like this pic below, but your windows should already be on it.


8. Grab your black fabric and measure a piece that will fit as a band all the way around the pillow length wise. Make sure its as wide as you want it to be.


9. Once you have your black fabric measured, pin the long sides together on the wrong side of the fabric.

10. Sew the long side together and turn it to the right side.

11.Take thumb and middle finger, squeeze pillow in the middle to make a bow (Scientific huh?).

12.Wrap black fabric around to measure what length of it you need.

13. Cut extra fabric if you have any, Fold fabric in half so that the seamed part is on top. Sew ends to close up strap. Twist fabric so that the seam is on the inside part.

14. Do the thumb and middle finger trick again, this will ensure that you get the cute little folds in front for your bow and generally part your pillow stuffing. Work black band around pillow by squeezing one edge. Keep other hand in the middle of the pillow so you know where to place your band and keep stuffing seperated.


15. Now take the 5 inches you left un sewed and iron so that the seam allowance is on the inside.

16. Sew 5 inches in a ladder stitch, If you do not know how to do this you can find a fabulously easy tutorial at How to Sew. And there you go, you got yourself a Tardis Bow tie pillow to remind you how much you adore The 11th doctor :)


Nope its not pro status, but its a pretty freakin neat idea I came up with. Imagine how it would look if a person that had way more experience in sewing made it. Have fun!!!

*I made Our little Ones friends some smaller ones for Christmas presents a few days after I made this Tardis one. The old rule is true, "Practice makes perfect." So I intend on trying this again till its almost perfect :)