
A few days ago, hubby received some swag from work, well it was a large X box T shirt. He dint want it, but he took it home cause he knew I would want the shirt or use the fabric for whatever. Anyways I loved the shirt, but it was gigantic on me so I decided to do a few things to it so I can actually wear it, well besides to bed that is.
So today I'm going to show ya'll how I did it. Its adorable, I just finished it tonight (sat) and I intend on wearing while we are out tomorrow. Hey it beats my normal T shirt and Jeans that I love wearing.

Materials:
1. Elastic ( Long enough to fit around your shoulder. Mine is re purposed from a fitted sheet)
2. Large T shirt
3. You sewing machine and tools that come with it.
* Please read all directions before starting project
1. Grab your large t shirt, don't go out and buy one. I'm sure you have one laying around that you no longer wear. The pics are a bit off, I dint have enough patience to grab and set up the Go Pro.




So today I'm going to show ya'll how I did it. Its adorable, I just finished it tonight (sat) and I intend on wearing while we are out tomorrow. Hey it beats my normal T shirt and Jeans that I love wearing.

Materials:
1. Elastic ( Long enough to fit around your shoulder. Mine is re purposed from a fitted sheet)
2. Large T shirt
3. You sewing machine and tools that come with it.
* Please read all directions before starting project
1. Grab your large t shirt, don't go out and buy one. I'm sure you have one laying around that you no longer wear. The pics are a bit off, I dint have enough patience to grab and set up the Go Pro.

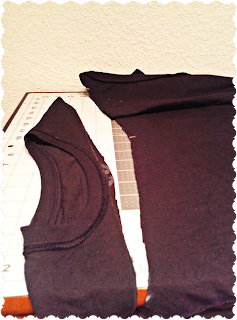
2. Turn it inside out and lay it out,mark the middle of the collar. From the seam of one sleeve measure one inch in and mark. Do the same with the other sleeve. Connect marks just like this.

3. Grab your fabric scissors and carefully cut the shirt following this line.

4. Make a 1 inch seam on the top part of the shirt where you just cut, all the way around. This is where your elastic is going to go.

5. Once that is done, sew all the way around BUT leave a about a half an inch un-sewn so you can put your elastic though here. Grab your elastic and work it though the tube. Once the elastic is though, put shirt on and measure how much elastic you need to cut off. make sure its comfortable on you, not to loose or not to tight. While you still have the shirt on, cut the elastic to take off excess and tie each side together to complete the shoulder. Take the un-sewn part back to your sewing machine and sew. It should look like this.

6. Lay out you shirt so that the sleeves are flat, from the armpit make an angled line to trim the sleeves like this. Do the same thing about an 2 inches away from the elastic on the shoulder. Don't touch the other sleeve just yet.

7. Cut sleeve using your line and pin. Take the little pieces that you just cut out put it on top of the other sleeve and use them like patterns so the two sleeves are exactly the same size and cut. You cant tell here, but I pinned the little pieces on top of the other sleeve before I cut it. I recommend you doing the same. After you cut to match the other sleeve pin it as you did the other.

8. Lay the bottom of your shirt out ( make sure your shirt is still inside out and your working on the front of the shirt). Measure 3 inches from the bottom and 3 inches from the side on each side and mark it.
I did mine 5 inches from the bottom since I am so short, its really up to you how short you want the shirt.

9. Using you marks bunch and pin. bunched about an inch and pinned it and I did this 3 times. So I started 3 inches from the side, grabbed the bottom bunched and pin til I got to my 3 inch ( or 5 in my case) mark. Do this on both sides of your shirt and only to the front.

10. Grab a ruler and take the bottom of ruler and sit it flat right on top of the last bunch you just pinned, align the ruler so it meets the side seam and mark a line, do this on both side and it should look like this. (without the wrinkles in the middle)

11. Go back to your sleeves and sew right on the edges of the cuts so that they are complete sleeves, then starting at the bottom of your shirt, using your marked line sew over the bunches and follow the line all the way to the edge of the shirt. Do this on both sides and that's it! You got yourself a cute little off the shoulder shirt. Just add a cute necklace and a skirt or jeans, your set.


Have fun adding this to wardrobe this summer :)




 Posts
Posts


