A few days ago, hubby received some swag from work, well it was a large X box T shirt. He dint want it, but he took it home cause he knew I would want the shirt or use the fabric for whatever. Anyways I loved the shirt, but it was gigantic on me so I decided to do a few things to it so I can actually wear it, well besides to bed that is.

So today I'm going to show ya'll how I did it. Its adorable, I just finished it tonight (sat) and I intend on wearing while we are out tomorrow. Hey it beats my normal T shirt and Jeans that I love wearing.


 Materials:

1. Elastic ( Long enough to fit around your shoulder. Mine is re purposed from a fitted sheet)

2. Large T shirt

3. You sewing machine and tools that come with it.


* Please read all directions before starting project


1. Grab your large t shirt, don't go out and buy one. I'm sure you have one laying around that you no longer wear. The pics are a bit off, I dint have enough patience to grab and set up the Go Pro.


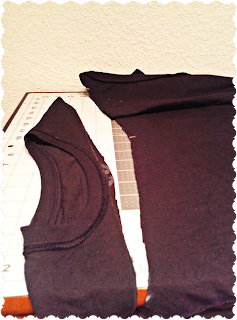
2. Turn it inside out and lay it out,mark the middle of the collar. From the seam of one sleeve measure one inch in and mark. Do the same with the other sleeve. Connect marks just like this.


3. Grab your fabric scissors and carefully cut the shirt following this line.


4.  Make a 1 inch seam on the top part of the shirt where you just cut, all the way around. This is where your elastic is going to go.


5. Once that is done, sew all the way around BUT leave a about a half an inch un-sewn so you can put your elastic though here. Grab your elastic and work it though the tube.  Once the elastic is though, put shirt on and measure how much elastic you need to cut off. make sure its comfortable on you, not to loose or not to tight. While you still have the shirt on, cut the elastic to take off excess and tie each side together to complete the shoulder. Take the un-sewn part back to your sewing machine and sew. It should look like this.


6. Lay out you shirt so that the sleeves are flat, from the armpit make an angled line to trim the sleeves like this. Do the same thing about an 2 inches away from the elastic on the shoulder. Don't touch the other sleeve just yet.


7.  Cut sleeve using your line and pin. Take the little pieces that you just cut out put it on top of the other sleeve and use them like patterns so the two sleeves are exactly the same size and cut. You cant tell here, but I pinned the little pieces on top of the other sleeve before I cut it. I recommend you doing the same. After you cut to match the other sleeve pin it as you did the other.


8. Lay the bottom of your shirt out ( make sure your shirt is still inside out and your working on the front of the shirt).  Measure 3 inches from the bottom and 3 inches from the side on each side and mark it. 
I did mine 5 inches from the bottom since I am so short, its really up to you how short you want the shirt.


9.  Using you marks bunch and pin. bunched about an inch and pinned it and I did this 3 times. So I started 3 inches from the side, grabbed the bottom bunched and pin til I got to my 3 inch ( or 5 in my case) mark. Do this on both sides of your shirt and only to the front.


10. Grab a ruler and take the bottom of ruler and sit it flat right on top of the last bunch you just pinned, align the ruler so it meets the side seam and mark a line, do this on both side and it should look like this. (without the wrinkles in the middle)


11. Go back to your sleeves and sew right on the edges of the cuts so that they are complete sleeves, then starting at the bottom of your shirt, using your marked line sew over the bunches and follow the line all the way to the edge of the shirt. Do this on both sides and that's it! You got yourself a cute little off the shoulder shirt. Just add a cute necklace and a skirt or jeans, your set.


Have fun adding this to wardrobe this summer :)


Hey! hope all is well with ya'll, Been a bit busy all week, summer is here in my neck of the woods, that means swimming, canoeing, tubing with fam and friends among other things, so don't be to angry if I miss a week posting here and there, but I promise you I will my best. I do post at least a few times a week on the Facebook Page, not necessarily a tutorial, but I do try to post some helpful DIY's. I also started an ETSY store and I'm trying to come up with more items for it.

Now that the blatant commercialism is done , today I am going to show you how to make a soap dispenser out of your old pasta jars. Its so easy its ridiculous. So anyways lets get to it!!!


Materials:

Pasta Jar and Lid
Phillips head Screw Driver
Acrylic paints ( Color of your choice)
A pump lid ( You can get them off your face wash, sanitizer or soap dispensers. I saved mine from one of my face washes. I knew I would eventually use that for something)
Glue Gun/Glue stick (optional)


* Pleas read all directions before starting project.


1. Grab your old pasta jar and soak it in soapy hot water so you can take the labels off. Give it about 15 minutes, and if its still difficult to take off just grab a butter knife, hold it under water and scrape it off.


2. While your pasta jar soaks, grab the top for it and hold your Phillips head screw driver. Put the screw driver head right in the middle, Grab a hammer, in this case I just grabbed one of my knives and used the handle to hit the top of the screw driver until it punctures the lid. Or just push the screw driver down into it, whatever works for you, just don't hurt yourself.


3. Grab the lid with the screw driver and push the thick part of the screw driver though it til your lid pump fits all the way though it. I had to work it left and right also just to make the hole big enough. Make sure not to make too big of a hole. I kept measuring it with the pump as I stretched the hole.


4. Next, take your glue gun and put glue on the inner edge of the pump, just enough to glue it to the lid. This part is optional, the pump will work regardless if you do this or not.

5. Grab your paints, mix up the colors that you want and paint the jar lid and the pump that's attached. While the paint dries grab your jar you have soaking and get the labels off.


6. Once your paint is dry, grab soap, hand sanitizer, your face wash. What ever you want to put in it and put the lid on and your done!


As you can tell I went a bit crazy with the paint, I loved the color I mixed up and I wanted everything to match..lol

Have fun, and I'm sure this wont be the last pasta jar project so save them. Dont save more than 5 or people will start thinking your a hoarder :D


Good morning :) Internet issues here... I'm stressed! wasted an hour of my time fixing what windows was suppose to update...
I should have finished this tutorial last night, but I didn't remember that it was not done til about 1 am :D

Anyways today I'm going to show you how to make faux Jute baskets, they are so cute!!

I drink a lot of coffee, more coffee than anyone should have in a day. Of course I go though alot of it, therefore with that comes a lot of coffee cans. I started saving them to put the lil ones crayons and pencils and whatever crafting supplies that need a container, I mean why buy it when you already have it right?
Well as practical as that was, I cant say it looked to cute sitting on her desk. First I covered them in fabric... they were cute but none of them really went with anything around the house.
I have these adorable Ikea baskets. I love them, they are made of rattan and I wanted something that looked organic and natural so that it would blend with the decor I'm trying to go with.

When I was younger I use to make Hemp bead necklaces and I use to love working with the rope. I could make anything with that rope, I even made purses with it. Well I figured, why not cover the cans in hemp?
Well I got on Amazon and started looking at the hemp ropes and none of them were the size that I wanted, then Amazon recommended Jute. I had no idea what jute was until I saw it. Now I am in love! I swear if I would cover everything I could with jute if hubby let me. Anyways enough rambling and lets get to work ;)


Materials:

Jute ( I got mine at Amazon, I covered these cans and I still have one whole roll left and I only spent $ 5 on both rolls)

Glue Gun/ Glue sticks 

Cans (any kind )


*Please read all directions before starting project*


1. Gather materials, remove can label.


2. Starting at the top of the can, start coiling while adding glue.Pull the rope tight as you coil it. You don't want it all lose and weird ( your thumbs might be sore after this). The top part requires you to add glue as you would normally, but on the sides you can bead it. Little drops spaced out so your glue can last longer.


3. Keep going around the can. Make sure that the layers of rope are as close as possible, as I added rope, while the glue is still hot I pushed the rope tight into the layer above it with a pencil eraser or you can just use your finger nail if you can stand the heat.


4. Keep going until the sides are completely covered. Its up to you if you want to do the bottom of the can and that's basically it. Now you have yourself an adorable container. It takes a bit of your time. I watched a movie while doing this. The time you spend doing this is worth it. I have these in our bathrooms and one in my kitchen. I can put anything in them. I've used all my coffee can and now I get to enjoy coffee while knowing that I can recycle the can after :)


I loved making these. Its very calming and tedious at the same time..lol Have fun!!


Hello :), I know its been a minute... what can I say I guess I proved to myself I am more Gamer than I am a crafter :P.
Anyways today I am going to show you how to re-purpose your old towels into hanging dish towels. Way better than spending your money on a few that will probably just get stained and eww anyways. You might as well recycle as you do so.


Materials:

Old Towel
Any scrap Fabric/ fabric
Velcro Strip ( You can get a strip at almost any store for $2, or find something you don't need that has Velcro.)
Sewing Machine and your typical tools that go with it.
Printer Paper
Printer


**Please read all directions before starting project**

1.Grab your scrap fabric, this is leftover sheet material from the Fabric Shower Curtain Tutorial. Cut it in 12x4 inch strips. This will make the border of your Dishtowel. You need 3 for each dish towel you intend to make.


2. Fold them in half the wrong way of the fabric and sew them into bindings, and turn right side out so that the part you sewed is on the inside.


3. Go to kleiosbelly which is the blog that inspired me to make these, but hers is made a bit different than mine. Grab her pattern or you can free hand your own, its much easier to borrow hers, seriously I tried to free hand mine and it turned out all wonky. Anyways print out her pattern, cut it out and place it on more scrap fabric you intend on using. Pin and cut out. You need 2 of each pattern (front and back) for one dish towel.


4. Take the top part and bottom of the pattern line it up so the right sides are facing each other and sew.


5. Do this to all 4 and this is how it should look.


6. Grab your Velcro and cut out a square piece of each side about this big.


7. Grab one of your completed pattern and decide where you want the Velcro. Remember the Velcro is what is going to secure the dish towel on what ever you intend on fastening it on. Make sure they are lined up correctly and you have enough room once they are fastened together for the handle of the oven or the drawer or whatever you want to put it on. Pin it and sew around the edges of the Velcro.


8. Grab your old towel and cut it 12x10. 12 inch across and 10 inch down.


9. Take the bindings that you made, line it up to the edge of your towel, fold it around the edge so that it is even on each side of the 10 inch sides, pin and sew. Do this for each side EXCEPT of the top part of the towel. Make sure to overlap the bindings on the corners so you it looks finished. Cut of whatever is left over.


10. Grab the 2 patterns that is going to be the top part of the dishtowel. Face them right side together. The velco should be on the inside, pin and sew around the edge except for the bottom part which is the widest part.


11. Turn in right side in and this is what it should look like.


12. With the velcro facing down, take the pattern back to your sewing machine and do a top stitch to finish it off. This is how it should look once you are done.


13. Set that aside and grab you towel and fold it as you would a paper fan on top. For each fold pin it. It should now measure 6 inches across.


14. Sew it all the way across. Keep the folded parts folded as you sew.


15. Take the top part of your dish towel and tuck the towel in it about an inch. Use your thumbs and fold the fabric about a quarter of an inch to make a seam and pin it once its straight.


16. Sew right on the edge with a decorative stitch, I used the zigzag stitch.And that's it! You can make 6 dishtowels with one old bath towel. Now you never have to buy dish towels ever again :)